
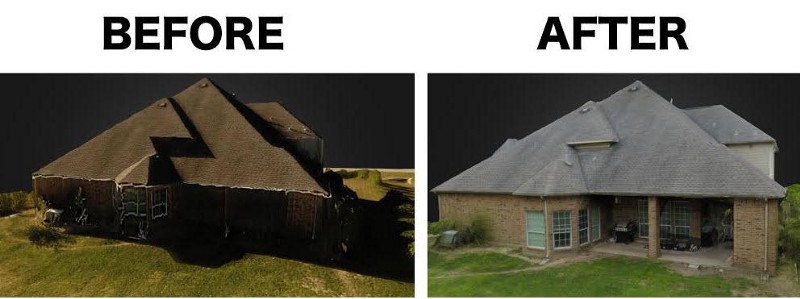
3D mapping software has the potential to revolutionize workflows across a host of industries. Many professionals already use 3D modeling software to create accurate, drone-generated models. But as with any technology, creating an accurate model with 3D mapping software takes some practice.
The good news is that by using DroneDeploy—or making a few adjustments to your process—you can greatly improve the accuracy of your models.
Below, we discuss the following tips for improving the accuracy of your drone-generated 3D models with 3D mapping software from DroneDeploy:
- Use DroneDeploy’s New Structures Mode
- Collect high-quality nadir images
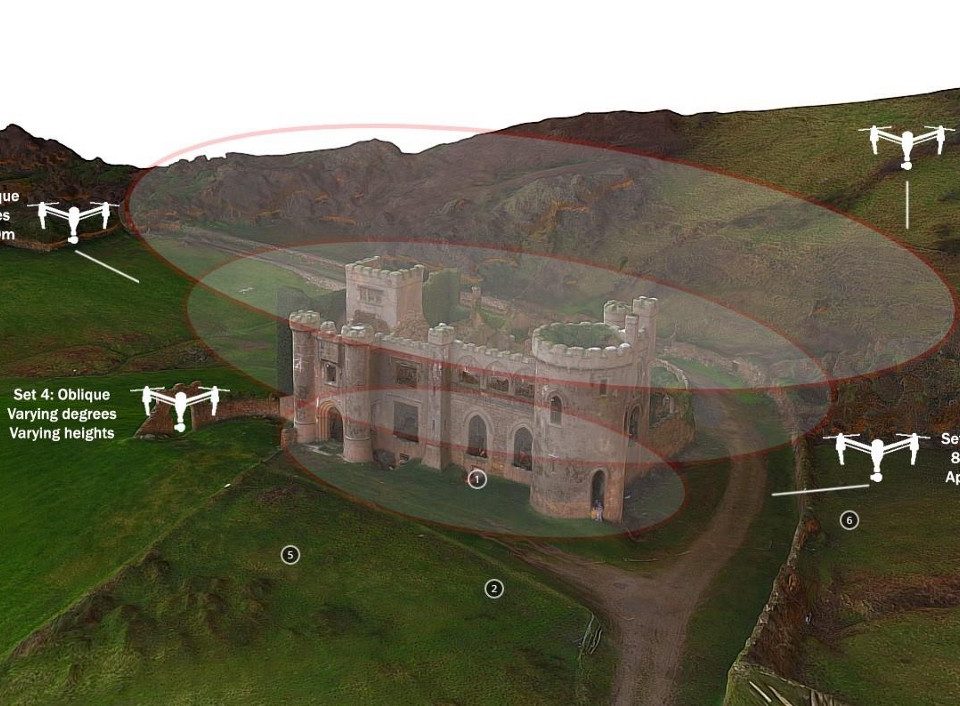
- Capture oblique imagery
- Plan tiered flights at varying heights
- Capture additional oblique photos from multiple angles
Use DroneDeploy’s Structures Flight Mode
There are several ways to create crisp 3D models with your drone. But the simplest way is DroneDeploy’s Structures flight mode. It’s designed to automatically collect the lowest number of images required to make a good model.
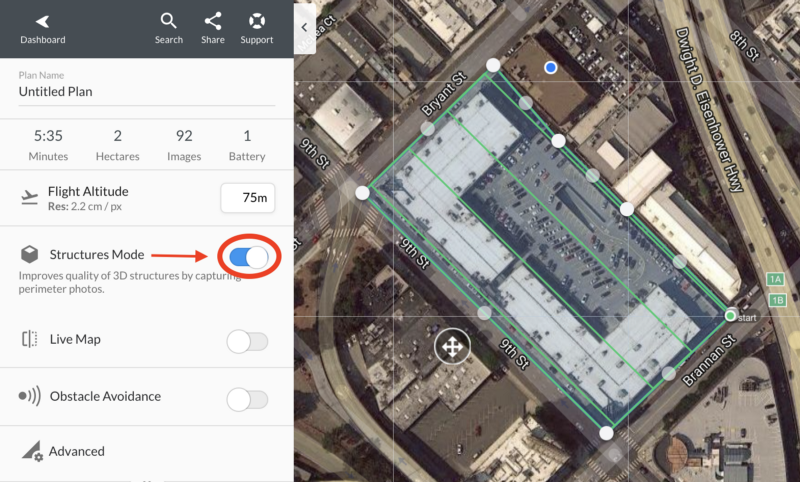
Using Structures mode is easy. In the app’s flight plan settings, enable “Structures Mode” with a flip of the toggle. This allows you to automatically capture predefined photos of a structure located at the center of your map.
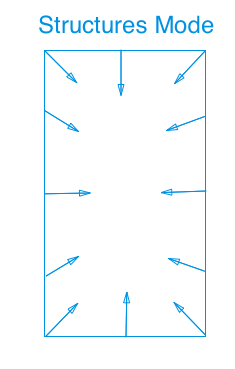
In Structures Mode, your drone will fly along the perimeter of your flight plan and take images every 5 meters, between 60 and 50 degrees down, looking towards the center of the map area. The image are captured at the flight altitude set when planning your flight.

Give Structures Mode a try during your next flight. You can also learn more about Structures Mode here.
Collect High-Quality Nadir Images
If you wish to capture aerial images manually, you can still make a great 3D model. But it will require more work.
The first step to making your model is collecting a high-quality set of nadir images — images taken from an overhead view with your drone’s camera pointing straight down at the ground — just as you would when generating any orthomosaic map. The higher the resolution and quality of these images, the more data points the 3D mapping software has to work with, and the greater the probability of matching common points on the model.
In an earlier post, we outlined seven ways to improve the accuracy of your orthomosaic drone maps. These tips are equally important when capturing nadir imagery for 3D models. They include:
- Increase Image Overlap- Increasing both sidelap and frontlap to at least 80% creates more matched points and greater accuracy, even at lower altitudes. Remember that overlap is reduced over tall buildings and trees.
- Fly at a lower altitude- This both captures more detail and increases the number of images, which in turn creates more possibilities for the 3D mapping software to match common points.
- Use a camera with a mechanical shutter– Upgrading to a mechanical shutter camera (e.g. DJI Phantom 4 Pro) reduces the rolling shutter effect, which can warp images and make it difficult for 3D mapping software to match points.
- Consider the weather and time of day- To minimize shadows, ideal flying conditions are midday or overcast weather.
This process can be automated with DroneDeploy, but you’ll manually want to collect Oblique images as well. Read on to learn how.